I've been calling this doc, while I was writing it, "EC2 for Poets."
The goal is to make cloud computing less mysterious by helping people through the process of setting up a server on Amazon EC2. The title derives from a class that was offered at the University of Wisconsin, when I was a grad student there, called Computer Science for Poets.
I loved the idea then, and still do. Engineers sometimes mystify what they do, as a form of job security. I prefer to make light of it, so more people will be tempted to give it a try. It was easy for me, why shouldn't it be easy for everyone?
The first version of this tutorial was written in Berkeley, CA in March 2009. I revised it in January 2011.
Even if you don't install the server, it might be useful to listen to the podcast to get an idea of why this may turn out to be important.
Creating a server on Amazon EC2
There's this great service called EC2 run by Amazon, the same Amazon you can buy books and refrigerators from.
EC2 allows you to create your own server in Amazon's server farm located somewhere "up there" in the clouds. It could be in Montana or New Jersey, or Bumfrak, Egypt. You don't have to know or care where the server is.
You also don't have to talk to anyone to create a server, and when you're done with it, just shut it off. You only pay for what you use, and it doesn't cost very much. If you run a server for 8 hours it costs about $1.
If you've ever purchased anything at Amazon, you're all set. And if you haven't, all you need is a credit card.
I think any reasonably knowledgable user could set up a server this way. You might have to scratch your head, or read the instructions two or three times to get past the hardest parts. I'm thinking of Jay Rosen or Nick Denton as I write these instructions. I think either of them could do it, if they really wanted to.
BTW, I don't own any Amazon stock, and I don't make any money when you set up a server. I just feel this is a basic skill any technical user should have. It will change the way you think about computing. I'm sure of it.
One more thing -- Ken Sedgwick blazed this trail. He wrote an initial howto which I expanded on in this piece. Thanks Ken!
Requirements
1. An account at Amazon.
2. A desktop or laptop computer, probably running Windows or Macintosh.
3. Anywhere from 10 minutes to an hour.
A Hello World server
In this experiment we'll start up a server that you can access over the Internet that will display Hello World and the current time on the server. You can refresh the page as many times as you like. The time will change, but that's all it does. From there, more complex experiments can and hopefully will be started.
Sign up for AWS
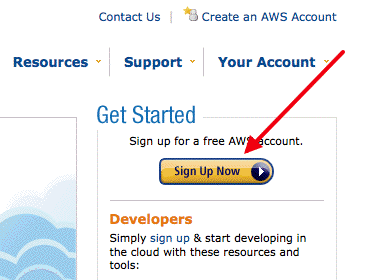
AWS stands for Amazon Web Services. It's an umbrella term that stands for all the services Amazon provides, like EC2. In order to set up your own server, you need to sign up for AWS.
To do so, go here: http://aws.amazon.com/ -- in the upper-right corner you'll see a yellow widget that says Sign Up Now. Click it. It'll ask for your email address and Amazon password, as if you were buying a book or shirt.
Unfortunately I can't tell you about the next page, since I can't see it. I have already signed up for AWS. Hopefully it's not too confusing. If you have trouble, grab a screen shot and post it in a comment and we'll try to help out.
Sign up for S3 and EC2
After signing up for AWS, you must also sign up for S3 (the storage system) and EC2 (to create servers).
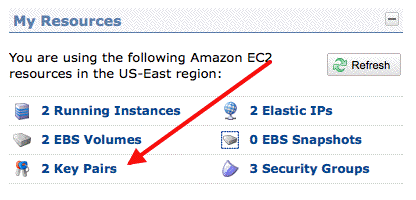
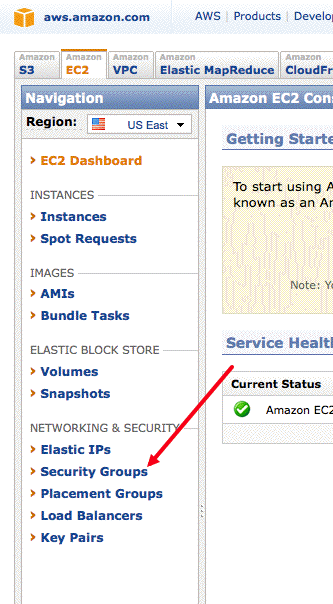
2. In the upper right corner is a panel called "My Resources" that lists the number of Running Instances, EBS Volumes, Key Pairs, Elastic IPs, etc. These are fancy names for computer stuff that aren't actually that complicated.
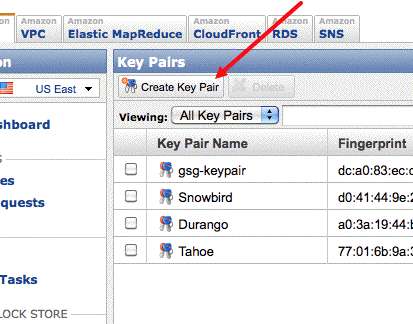
3. Click on Key Pairs. You should see an empty list.
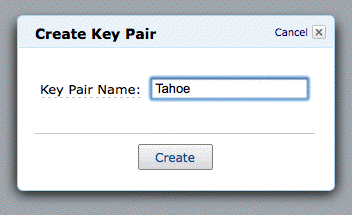
4. Click on the Create Key Pair button. A dialog pops up asking for the name. Enter the name of a place, like Tahoe. Click the Create button.
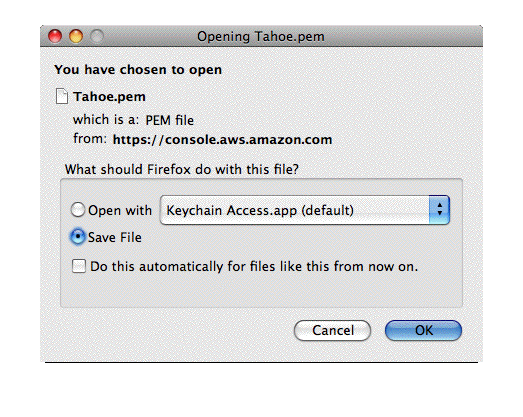
5. Now something interesting happens. It wants to save a file on your computer. This file is a key that unlocks all the web services. Without this file you get nothing. With it you get everything. So you obviously want to put this in a safe place and take good care of it.
Although your Key Pair file has a fancy .pem extension, it's really just a text file. You can store it anywhere on your system. Later in this tutorial, you'll open it with a text editor, such as Notepad on Windows or TextEdit on the Mac.
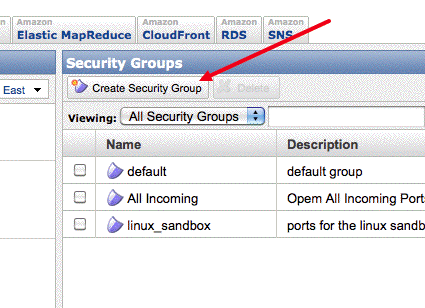
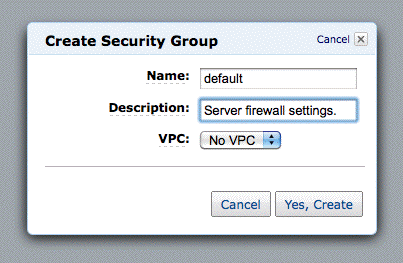
Create a security group
A security group is like the firewall in your operating system or router. It says what kinds of Internet messages can pass through to your server, and what kinds will be rejected.
3. A dialog appears, asking for a group name and description. You can call it whatever you want, I called mine "default" and described it as "Server firewall settings."
4. Click Create in the dialog.
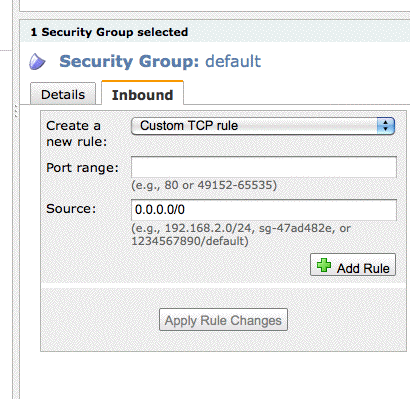
5. You should see your security group in the list. Click on it.
6. In the lower portion of the screen you should see information about your security group, with two panes: Details and Inbound. Click on Inbound.
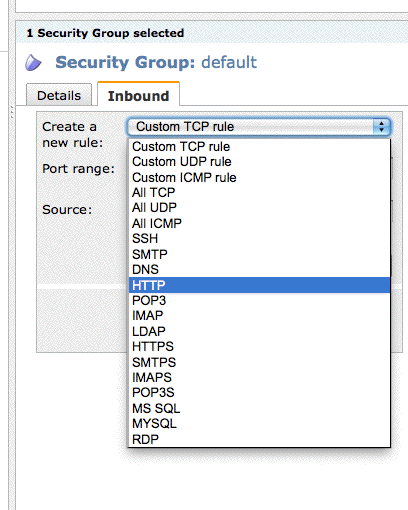
7. You should see a popup menu that includes a list of Internet protocols. Choose HTTP. Click the Add Rule button. An item is added to the right side of the panel. Do the same for HTTPS and RDP; allowing your server to receive secure HTTP requests, control the server using Remote Desktop Connection on the Mac or Windows.
8. When you're done, click the Apply Rule Changes button.
Launch your server
Now it's time to create your virtual machine and launch it.
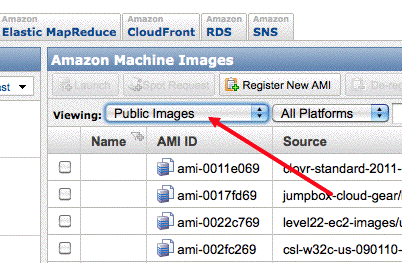
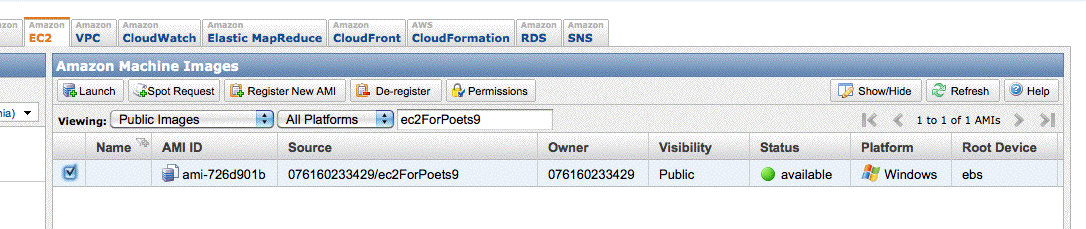
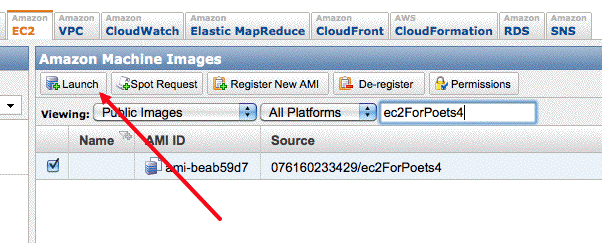
1. In the left margin of the dashboard, click on the AMIs link. You should see a popup menu in the upper left corner of the panel. Choose Public Images from the popup. It might take a few seconds for the list to appear (there are a lot of public images).
2. Type ec2ForPoets9 in the little search box near the top of the screen. A single item should show up in the list. Click on the checkbox next to its name.
3. Click the Launch button near the top of the screen.
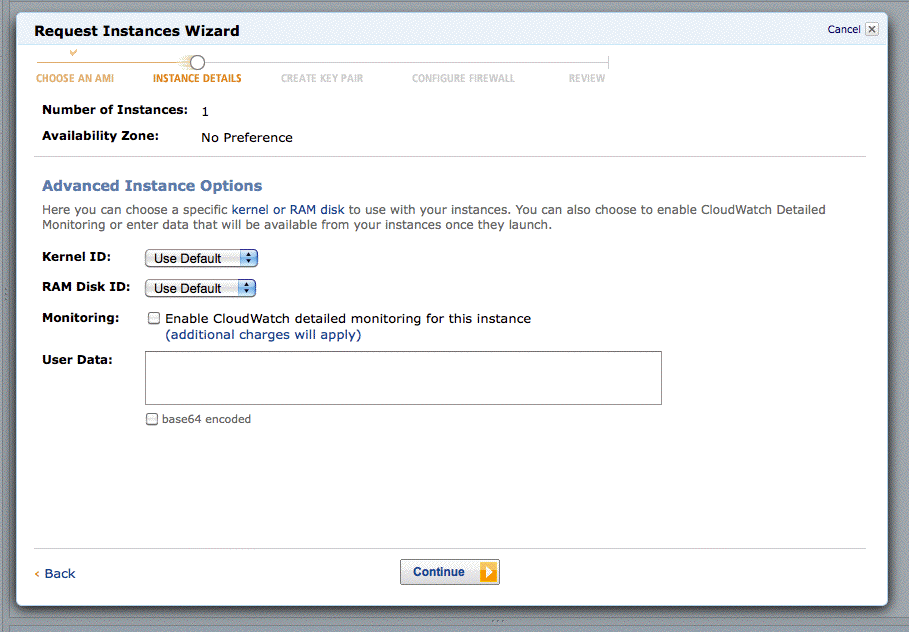
5. Set Number of Instances to 1 (it should be the default).
6. Leave the Instance Type as Small (m1.small, 1.7 GB).
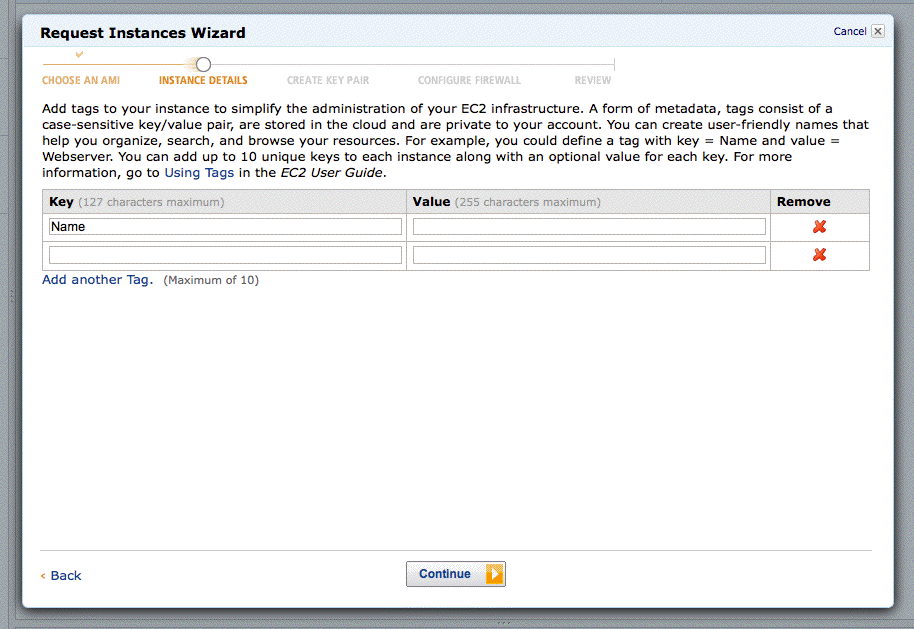
7. Click Continue to get to the next dialog. You can accept the defaults.
8. Click Continue to get to the next dialog. Again, you can accept this as-is also.
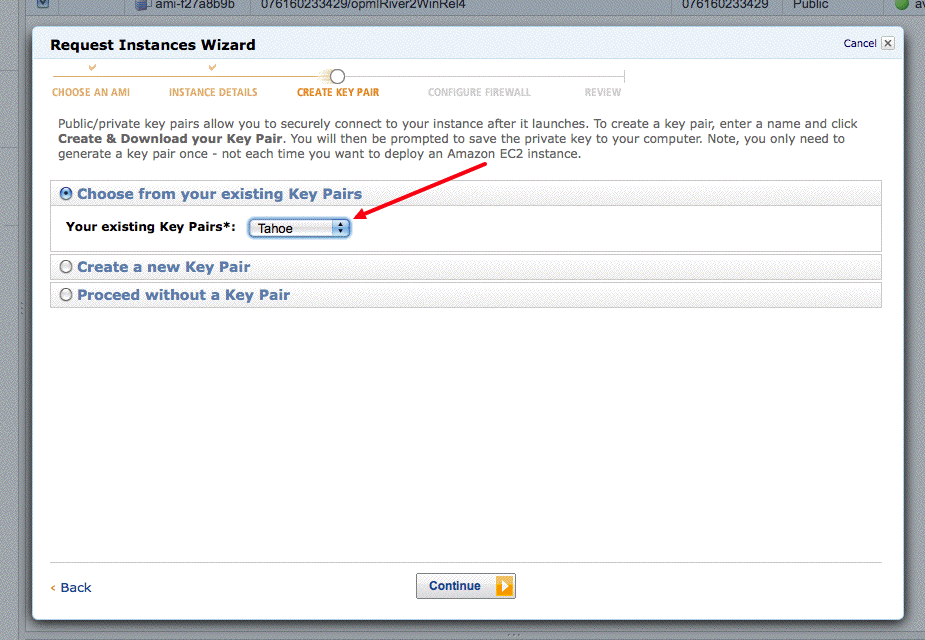
9. Click Continue to get to the next dialog. Click the radio button next to Choose from your existing Key Pairs, and then choose the one you created earlier in the popup menu. (We called our example Tahoe.)
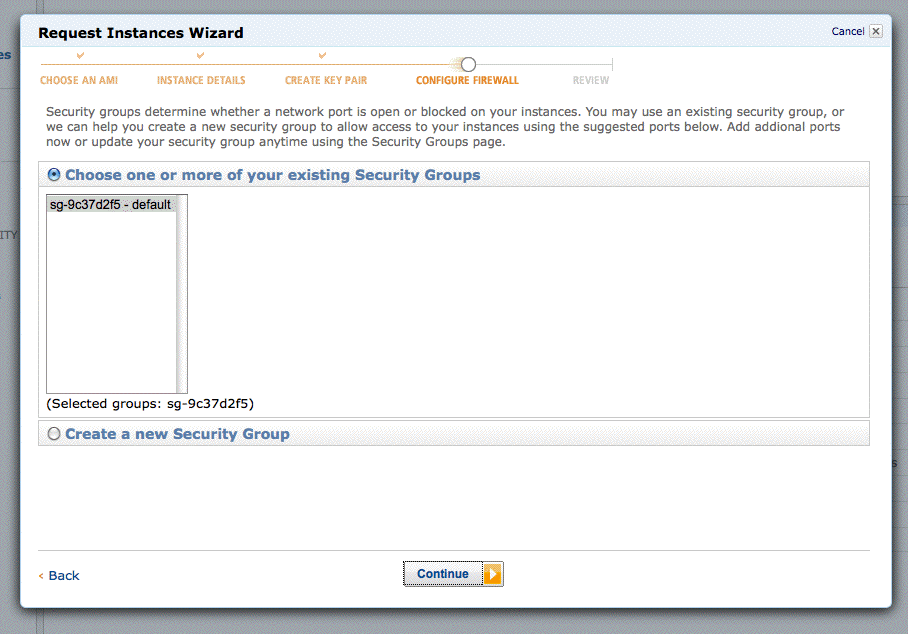
10. Click Continue to get to the next dialog. Click the radio button next to Choose one or more of your existing Security Groups, and then select the default Security Group.
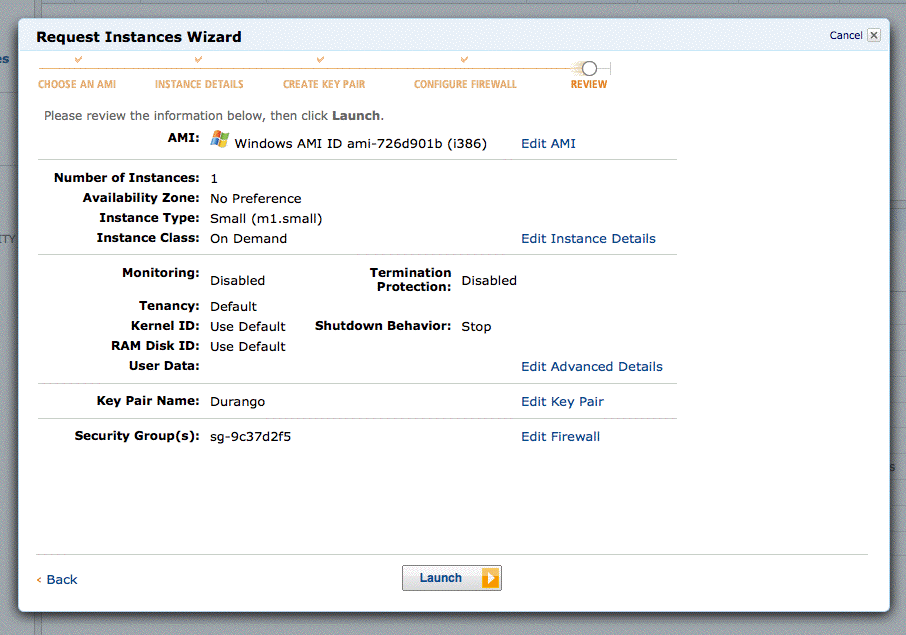
11. The final dialog in the sequence appears, summarizing the choices you made. If everything looks okay, click the Launch button at the bottom of the dialog. Pause for a moment to consider your accomplishment. You are now a Cloud Computing Expert.
12. In the left margin of the dashboard, click Instances. You should see a single entry whose status is "starting." We're now waiting for it to change to "running." This could take as much as 10 or 15 minutes, depending on how busy the angels and elves at Amazon are.
Notes...
Later if you want to go "shopping" for other AMIs, Amazon maintains a directory that's a bit like shopping for iPods or books, of popular AMIs. Too bad they don't offer the same reviewing options as they do for consumer products. (Consider this a feature request.)
In putting together the sample server for this tutorial, I started with Amazon's Basic Microsoft Windows Server 2003AMI with none of the frills.
Find or download Remote Desktop Connection
Remote Desktop Connection, or RDC, is an application for Windows or Mac that allows you to control a remote server like the one you just launched.
If you're using a Windows machine, RDC is in the Start Menu, Programs, Accessories.
Update: An even better choice for Mac users is the open source CoRD app. It's better at managing more than one server at a time, and just plain better than the Microsoft app, which is showing clear signs of age. Plus you don't have to install Rosetta to use CoRD.
Wake the server up
Wait as much as 15 or 20 minutes for the status of the server in the Instances panel to change from "starting" to "running." Now we just have to kick it in the butt to get the server software launched. You do that by logging in the first time.
1. First, locate the Key-Pair file (mine is called Tahoe), open it with a text editor (Notepad on Windows, TextEdit on the Mac). Select-All. Copy. Close the file.
2. In the left margin of the dashboard, click on the Instances link.
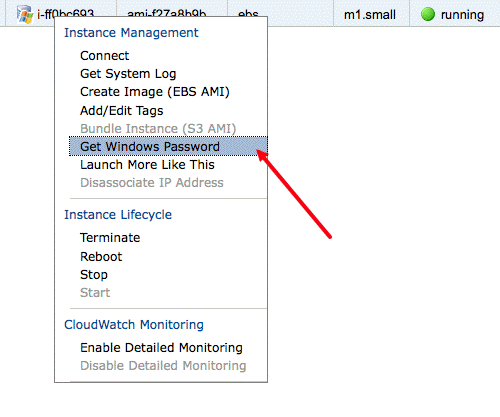
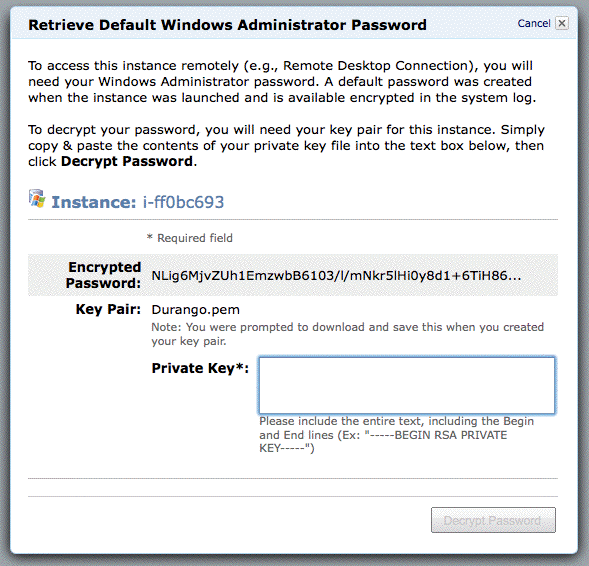
3. Right-click on the instance you just launched. A popup menu appears. From the menu, choose Get Windows Password.
4. A big dialog appears explaining what it means to decrypt your password. Click in the "Private Key" box and paste the text you copied in Step 1. Click the Decrypt Password button. It takes a few seconds, then...
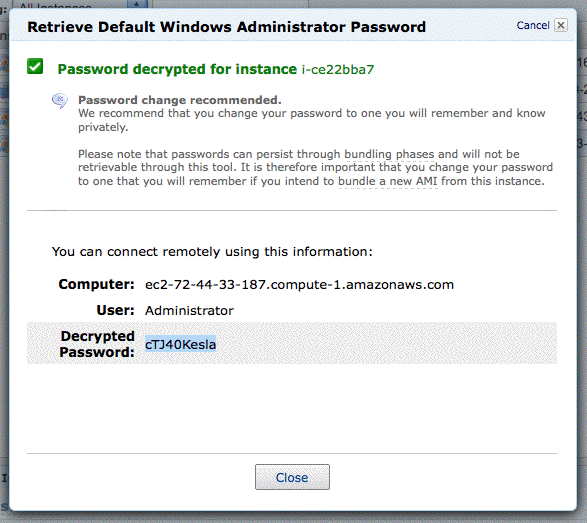
5. A dialog appears with the server password. Leave it open so you can refer to it in the next steps. (If you know how, you might want to take a screen shot of this dialog.)
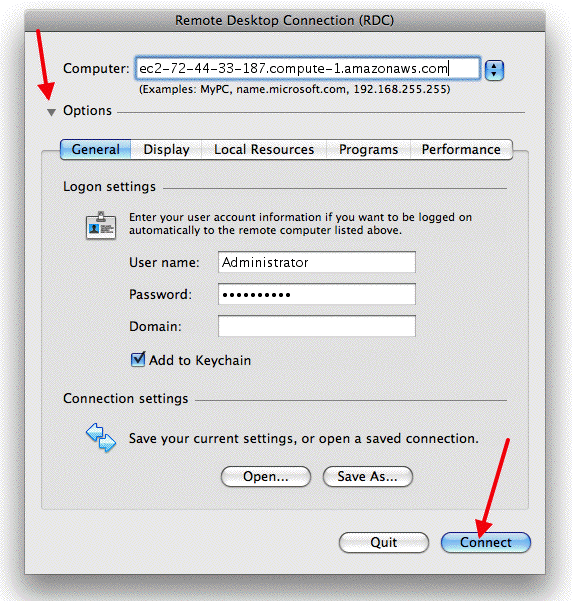
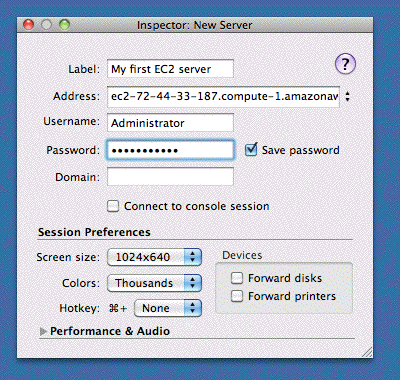
6a. Launch the Remote Desktop Connection app from the previous section. Copy the address of the computer to the clipboard (in my screen shot it's ec2-72-44-33-187.compute-1.amazonaws.com). Paste it into the dialog that opens in the RDC app. Click on the wedge next to the word Options in the RDC window. Where it calls for the User name, enter Administrator. Then Copy the Decrypted Password from the dashboard, and paste it into the Password part of the RDC app. Click the big Connect button in the lower-right corner of the RDC window.
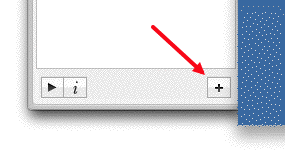
6b. If you're using CoRD on a Mac, instead of Remote Desktop Connection, the process is slightly different. In the lower left corner of the app window you'll see a wedge, the letter i and a big plus sign. Click on the plus sign. A dialog appears. Enter a name for the server, I like to name mine after football players or soft drinks, but you could just call it My First EC2 Server. Then enter the address as in step 6a. The username is Administrator, and the password comes from step 5. Click the Save password checkbox so you don't have to enter the password every time you connect. Below that, you can determine the size of the display, and some very nice advanced options that you can worry about later (accept the defaults for now). Close the Inspector and double-click on the name of the server in the left margin of the big window.
7. If all goes well, you should see your server running in a window on your desktop. But don't be fooled, this virtual computer exists in the cloud, not here or where you are. It's somewhere "up there."
8. Three apps are visible: Firefox, the OPML Editor and the Windows Task Manager. OPML is, in addition to be an outliner, a web server. In the next section we'll access this server in a web browser on your desktop machine. You can close the RDC window, or leave it open, if you want to explore. It's just a Windows machine.
Visit your server
1. In the left margin of the dashboard, click on the Instances link.
2. Click on your instance. (There probably is just one in the list.)
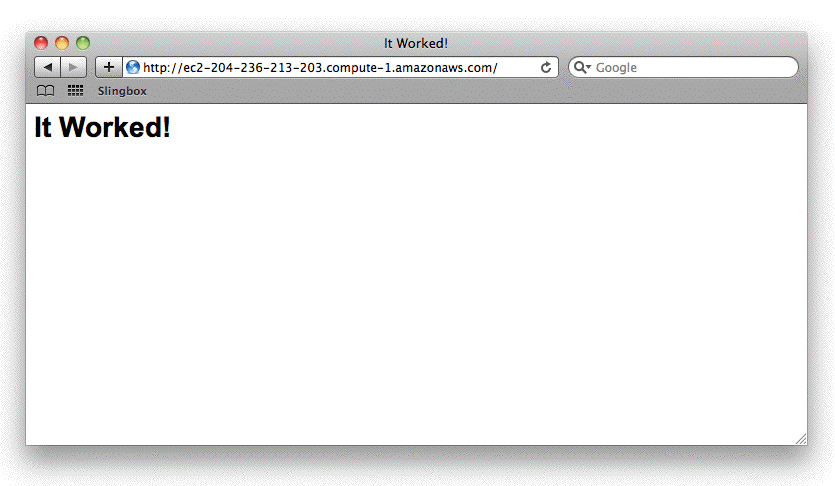
4. Open a web browser, paste into the address bar and press Return. You should see a simple message: It Worked!
5. Now let's see if the dynamic server is running. Add "helloWorld" at the end of the URL in the previous example and press Return.
6. You should see Hello World, today's date, the time, the IP address of the server, and a counter that starts at 0, and increments every time you refresh the page, which you should do a few times to prove that it's a dynamic page.
Comments
You now have a server running. It's a customized version of the simplest Windows image on Amazon. I added two open source programs: 1. The OPML Editor (web server). 2. Firefox (browser). It's a fully functional server, can run anything any of these programs can run.
The OPML Editor comes with one big app pre-installed -- River2, which is a River of News. It's the same software that powers wikiriver.org. If you're going to leave the server running as your personal river of news, here's a list of tips.
When this package was put together the operating system and the included apps were all fully updated. If it's been months or years since it shipped, you may need to do some updating to get current. All three components will check automatically to see if they need updates.
Poke around, look in folders, see what's there. I tried to make it interesting and predictable. You can visit websites and install software. It's your server to do with as you please.
If you want to try out some of the tools that I've developed for the OPML Editor, bring the OPML app to the front and choose Tool Catalog from the Misc menu. A page opens in Firefox with the current list of tools you can install. All the tools have docs, and browser-based configuration.
Or it may make sense to shut off the server right away. The important thing is that now EC2 is not a mystery. Its purpose is to give you access to ordinary computers in a place where they're easy to get at through the Internet. The easier it gets, for more people, the more interesting things we'll be able to do, together.
Running your own river of news
The OPML Editor comes with River2 pre-installed. You don't have to do anything to get it started, it's already running. Here are some suggestions if you're going to run your own River of News.
1. Review the Prefs page and be sure you like the way they are set. Most important, if you plan to access your server over the net, change the Admin password at the bottom of the page. We set it to something random so that other people wouldn't be able to access your server.
2. I've subscribed to several feeds just to get things started. You may not want to keep some or all of them. I also subscribed you to a reading list that I can add or remove feeds from. You can unsub from that too if you like.
3. If you're going to use this server for a while, it may be a good idea to assign a domain name to it. Referring to a server by its dotted ID is going to get old after a while. Here's a tutorial that shows you how to do it.
How to turn off the server
As Amazon makes very clear, until you shut off the server, they're going to charge $0.125 per hour. So if you're done, here's how to turn it off.
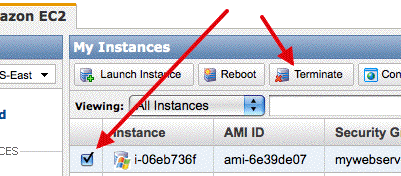
1. From the dashboard, click on Instances. You should see one item, the instance we just launched.
3. Right-click it, and choose Stop from the popup menu. This causes the server to go to sleep, it's as if you closed the lid on a Windows laptop. You can turn it back on by choosing Start from the same menu. Both these operations are quite quick, they take a few seconds each.
4. If you know you never want to run this instance again, choose Terminate from the popup menu. This shuts down the server, and throws away the instance permanently. It's like taking your PC out to the garbage dump and driving away.
Support and community
Please keep comments here to support issues. I'm sure you can find other places to post your political and personal opinions.
We have a mail list for people who are running servers. It's for support and for discussing new features. The EC2 For Poets server is actually turning into a community. We're doing some very interesting stuff.
Over time I've written more tutorials for managing these EC2-For-Poets servers. I'll try to keep the list below complete.

 There's this great service called