Tuesday, August 5, 2008, 8:47:47 AM. |
About the OPML Editor
|
| Windows | Macintosh | Meaning |
| Control-U | Cmd-U | Move a line up at the same level |
| Control-D | Cmd-D | Move a line down at the same level |
| Control-R | Cmd-R | Move a line to the right (it becomes the last subhead of the line above it). |
| Control-L | Cmd-L | Move a line to the left (it becomes the next sibling of its former parent). |
Tab and Shift-Tab to move a line to the right and left.
Adding new lines to an outline 
To add a new line to an outline, place the cursor above or near the point where you want to add the line, and press Enter. (Mac users press Return).
Use the reorganization commands to position the line exactly where you want.
Type the text. If you want to enter another line, press Enter. When you're done entering new lines, click on the wedge to the left of the headline.
Undo
Most editing operations in the outliner can be undone. The Undo command is in the Edit menu.
Two modes
There are two modes in the outliner: text mode, where the insertion point is a flashing caret; and structure mode, where the cursor is shown as a black inverse bar.
You can toggle between modes by pressing the numeric keypad's Enter key. You can also use the mouse -- if you're in text mode, click on the wedge to return to structure mode; if you're in structure mode, click on the text to get the flashing caret. On Windows F2 toggles between text and structure mode.
The structure mode cursor is also called the "bar cursor" because it looks like a bar.
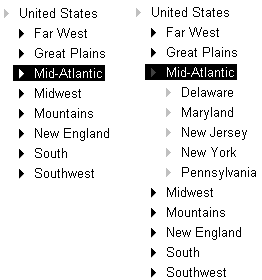
Selecting multiple headlines
To select more than one headline, on Windows, hold down the Control key and click on the headlines you want to select. On a Mac hold down the Cmd key and click.
HTML editing
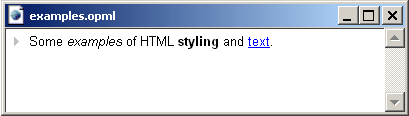
The HTML menu has many common formatting and linking commands, so you don't have to memorize complex codes. And for the most common stylings, bold, italic, underline; and linking, it displays the markup in a visible way.
If you want to switch modes and see all the HTML tags, choose the Format Text command in the HTML menu, its keystroke is Control-` (Cmd-` on Macintosh).
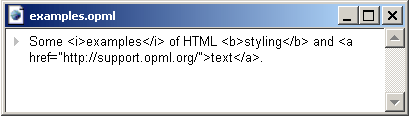
The specific HTML tags that it generates are: <b>, <i>, <u>, and <a href..>.
XML editing
The OPML Editor can also be used to edit any XML file in the outliner.
When you choose the Open command, and the file you're opening has a .xml suffix, it opens in an outline. One of two things happen:
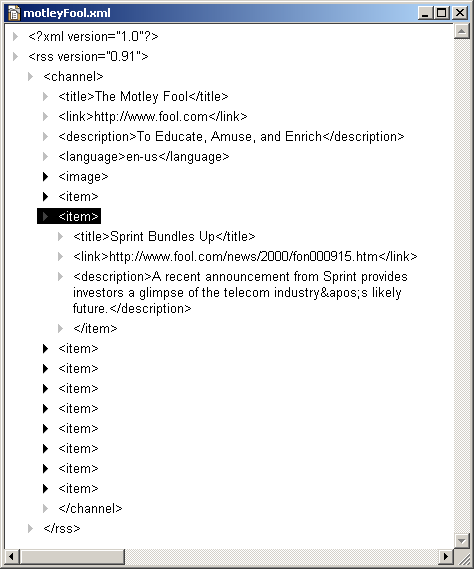
1. If it's not an OPML file, you see the XML as it is stored in the file. You can edit the tags, of course. When you save, it saves as XML, it doesn't convert the outline to OPML format. Screen shot.
2. If, instead, it is an OPML file, the file opens as an outline and the tags are hidden.
Right-click menus
On Windows and Macs with two-button mice, you can "right-click" on something by pointing at the object and clicking on the right mouse button. On one-button Macs, hold down the Control key while clicking on the object.
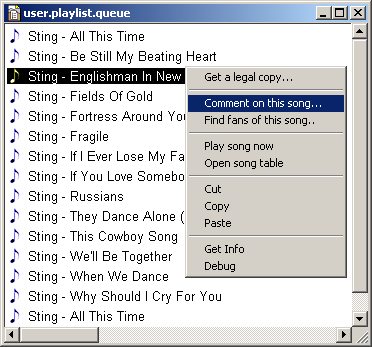
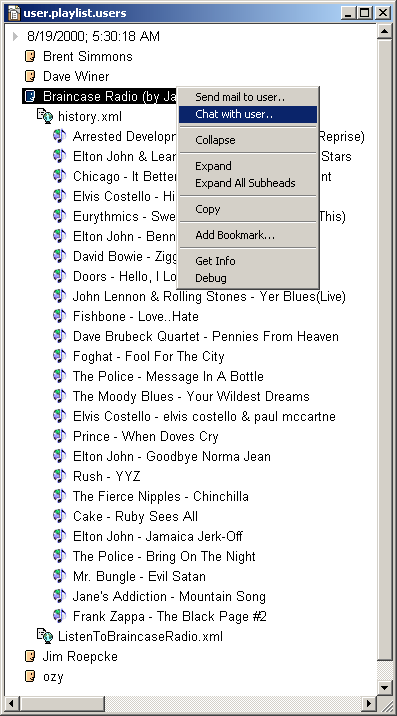
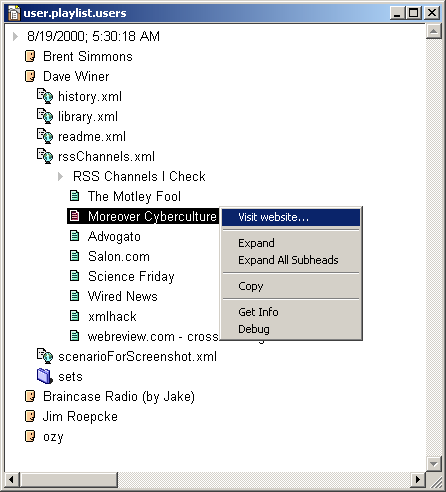
Right-click menus are also called "contextual menus" because what you see in them depends on what you clicked on. There are commands that only apply to songs, and those that only apply to users, and RSS feeds, and so on.
There's also a special menu where you can add your own commands that will always be there when you right click. To edit your custom right-click menu, choose Edit Right-Click Menu from the Developers sub-menu of the Tools menu.
Screen shots: Right-clicking on a song, user, RSS channel.
Comments
The OPML Editor can be used to edit scripts, and if you're writing scripts you need to be able to add comments.
If you want a line and all the lines nested underneath it to be viewed as a comment, press the Shift key while you create the line. Note that instead of a wedge, the line has a chevron to its left.
Any text that's indented under one of these lines is also viewed as a comment. You can go on and on, but thankfully, readers can collapse the whole comment down to a single line. So if you're verbose, the code doesn't become less readable.
Comments play an important role in programming. They are bits of text that are meant for the programmer but are ignored when the code is compiled. Comments are also used in other ways, for example in Directories, a subordinate comment is the description of its parent.
You can also add comments at the end of a non-comment line by putting a pair of slashes before the comment. This only works for scripts, other kinds of outlines generally do not respect this convention.
Commands in the Outliner menu
Expand -- Expands the child lines one level of indent below the selected parent.
Expand All Subheads -- Fully expands all levels of the child lines of a selected parent.
Expand Everything -- Fully expands all lines in the outline window.
Collapse -- Collapses all the child lines of a selected parent.
Collapse Everything -- Collapses all of the lines to the top level parent lines of the outline hierarchy.
Collapse To Parent - Collapses all siblings of the cursor line and places the cursor on the parent.
Toggle Comment: If the cursor line is a comment, make it not a comment; if it's not a comment, make it a comment.
Move Up: Moves the selected line (and all its child lines) one line up.
Move Down: Moves the selected line (and all its child lines) one line down.
Move Right: Moves the selected line (and all its child lines) one indent to the right.
Move Left: Moves the selected line (and all its child lines) one level to the left. This may cause the line to move jump to the next available slot at the next higher level of indentation.
Hoist: Change the display to make all immediate subheads of the current heading to appear to become summits.
De-Hoist: Reverse the last Hoist command on this outline.
De-Hoist All: Reverse all Hoist commands on this outline.
Sort: All lines at the current level are sorted alphabetically.
Delete All Sub-Heads: All sub-items to the current line will be deleted. Warning: this can't be undone.
Other topics
Linking and The World Outline, Inclusion.
blog comments powered by Disqus
Last build: 8/13/08; 10:22:21 AM.