Getting Comfortable With Outlines
Getting Comfortable With Tables
Getting Comfortable With Outlines
Hierarchical text
Before we can proceed to the next step in our understanding of Frontier's Web site management structure -- templates -- we need to understand about outlines.That's partly because templates often are outlines; the default template that Frontier installed for you when you created your site with New Webite is an outline. The object database itself is like a giant outline. Also, Web pages can themselves be outlines, and once we know about outlines we'll be able to get Frontier to do some more HTML for us.
Outlines are so central to Frontier that there is an Outliner menu. Most of the time you'll be working on an object that responds to commands in this menu: whether it's an outline, a script, a menubar, or the object database itself. Outline structures are everywhere in Frontier.
An outline is a way of storing and viewing snippets of text hierarchically. (I say "snippets" because in Frontier every line of an outline can be no longer than 255 characters.)
To see one, navigate back to the top level of your Frontier.root. Select the websites table. Under the Table menu, choose the Outline Table command. Say yes at the prompt.
After a couple moments, a new outline at websites.tableOutline will open in its own window.
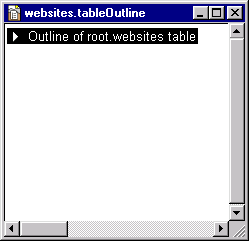
From the Outliner menu, choose Collapse Everything. You will now be seeing something like this (as with a table, you can change the font and size of the whole outline if you wish):

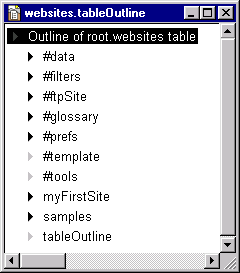
Double-click either on the triangle at the left of the word "root" or anywhere to the word's right, and it will "expand" to show its "contents":

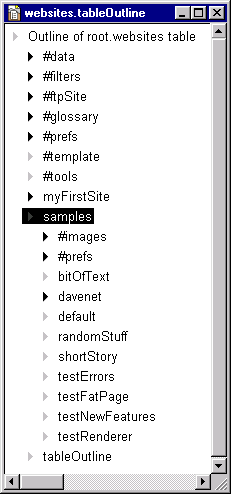
Now double-click to the left or right of the word "samples" and it too will expand, and you'll see something like this:

Are you getting the idea of what you're seeing? Frontier has a made a hierarchical chart, an outline, of the contents of the websites table. Which is cool, but it isn't the point. The point is, you need to be familiar with how navigation and expanding and collapsing of lines works in an outline.
Already you can see why an outline is useful; it can contain lots and lots of material, yet because that material is arranged in collapsible hierarchies you can see as much or as little of it as is convenient at any particular time. This is what makes an outline a useful hierarchical viewing mechanism.
Working with outlines
So, here are the things you need to know. Try them out; play with this outline to your heart's content. Feel free to edit it and change it around in any way; you can always rebuild it again later on so that it once more accurately reflects the structure of your database.Double-clicking to the right or left (or on the triangle) of a line collapses or expands it; so does command-comma when a line is selected. See what this does to the triangle? A black triangle means the item possesses collapsed (hidden) sub-items; a grey triangle means the item either has no sub-items or is expanded already.
Hitting Enter toggles between selection and content mode, just as in a table; but, unlike a table, even when you're in selection mode you can just start typing and you will immediately be placed in content mode (and what you type will replace the contents of the line).
In selection mode, the up- and down-arrow keys move among items at the same level of indentation (for example, in the above picture, the down-arrow would take you from "samples" to "tableOutline," skipping all the contents of "samples" because they are at a deeper level of indentation) and in the same "bundle" (that is, among items which are sub-items of the same thing).
The left- and right-arrow keys move up and down among all the items. The keypad plus and minus keys expand and collapse headlines.Control-left-arrow (or command-left-arrow -- think command for Macs, even when you read control) collapses to the "parent" of the currently selected line; control-down-arrow moves you down one item, but expands the item you just left; control-up-arrow takes you to the line above on the same level, collapsing if open. There are other navigational shortcut keystrokes but those are the most important ones.
Here's a summary of the most-used shortcuts:
Action Shortcut toggle content / selection mode Enter collapse or expand a line dbl-click triangle, or keypad plus and minus up/down within bundle up-arrow, dn-arrow up / down absolutely lt-arrow, rt-arrow collapse to parent line control-lt-arrow
Moving items around
Control-U, control-D, control-L, and control-R move the currently selected line up, down, left, and right respectively.There are two important things to understand about this. First, whenever you move an item, you move all its sub-items along with it, whether they are showing (expanded) or not; that's what makes an outline a useful hierarchical storage mechanism.
Second, you can't move anything "up" or "down" out of the bundle it's already in; to do that, you must move it "left" or "right." You can only move something "right" if there is an item immediately above it at the same level, and it will then become a sub-item of that item -- its last sub-item if it already has sub-items.
If you move something "left," it may appear to leap wildly (for instance, try moving "#data," the first sub-item, to the left), but this makes perfect sense; it is moving to the next available slot at the next higher level of indentation.
You can also drag an item to another place. Try this; it takes some getting used to, but after a while you realize that the little arrow is showing you where the item will go if you release the mouse at any given moment.
You can also Copy or Cut an item and Paste it elsewhere; it will be pasted "down" from whatever is currently selected when you say Paste.
Notice, too, that you can select multiple items simultaneously by shift-clicking to the right or left of each one; you can then move them all at once by dragging or by cutting and pasting (which also brings them together) or by command-U etc. (which does not). Try it! This is one of Frontier's most brilliantly implemented features.
There are a couple of useful time-saving tricks when you want to rearrange large hierarchical blocks. Consider, for instance, how you might detach all the sub-items of "#data" and make them sub-items of "samples" instead. You could select them all, then move them; command-A selects all items in the current bundle; so does shift-double-click.
But here's another way. Select "#data" and choose Demote from the Outliner menu. This makes all the remaining members of the same bundle subordinate to "#data." Now hit command-L, then command-D, then command-R; now choose Promote from the Outline menu, which brings all the immediate sub-items of "#data" up to its level.
The trick we used was to make a lot of stuff subordinate to "#data"; that made it automatic for that stuff to be brought along with it when we moved it. Try playing some more with Promote and Demote; they can come in very handy.
Editing lines
We have said nothing so far of editing the contents of the actual outline items. The most important things to know are that (as we already said) Enter toggles between selection mode and content mode (and you can also just click in the text of an item to start editing), and that hitting Return always creates a new item, even if you hit it while you're in the middle of editing an item.In content mode, the Delete key removes the previous character (backspace), but in selection mode it deletes the current item -- and all its sub-items, so watch your step! (If you delete something you didn't mean to, you can Undo if you haven't done anything else yet.)
Note: if you hit Shift-Return you get a new line of a special type called a "comment," marked by a chevron character instead of a triangle at its left. Comments are very useful, especially in scripts but in outlines as well; but at the moment it will be best not to have any, so if this ever happens to you, just delete the item, or convert it to a non-comment by hitting control-backslash.
Summary time:
Action Shortcut move a line cmd-U, cmd-D, cmd-R, cmd-L new line Return delete in selection mode select, then Delete That's your lightning introduction to outlines, one of Frontier's most powerful features. Close the outline. You may even want to delete it: there's no need to keep it around, and you can always rebuild it later.
Now let's see some ways that outlines are used in Web site management.