Outline Formatting
Getting Comfortable With Tables
Getting Comfortable With Outlines
Outline Formatting
Templates as outlines
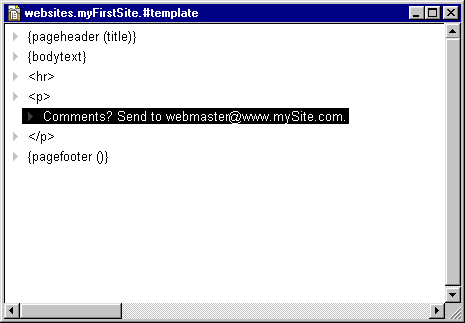
One of the nice things about making your template an outline is that, although this has no browser-visible effect on the output of your HTML, it does format the HTML in a legible way by adding lineation and indentation to match the outline structure.It also makes it easier to keep track of the use of tags in your template. For instance, suppose we were to reformat our #template outline to look like this:

The advantages of this are purely organizational and aesthetic, but organization and aesthetics can be very important when you're working with HTML.
Here, we can see clearly the structure of the document as a series of subordinations. We can see that the <p> tag is properly balanced by a </p> tag. And, after we render the page, the resulting HTML maintains this formatting through the use of tabs and returns, which makes the HTML easier to read (I'm talking about the HTML as text, not what you see in the browser; tabs and returns don't affect what shows up in the browser).
In templates, then, outlines have no effect other than convenience and aesthetics when you work with the HTML tags and output.
Web pages as outlines
On the other hand, you can also have a Web page be an outline. Why would you want to do this? Well, again it's organizationally convenient. Plus, you can insert comments (change a line to a comment with command-backslash, or make a new comment with shift-return); comments don't show up in the final HTML.But an even more important reason is this: you get to have the outline organization reflected in the resulting HTML -- and you get to choose how you want this done. You make the choice through the #renderOutlineWith directive.
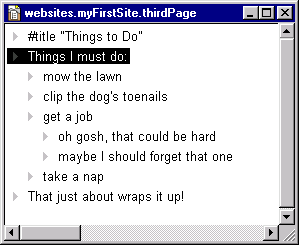
First, let's see what happens when we make a Web page be an outline without any #renderOutlineWith directive at all. Use the New Outline command from the Table menu to make a new outline called "thirdPage" (no quotes) in the myFirstSite table. Create an outline that looks like this:

Notice that outlines can contain directives just like any other Web page; we've started with a #title directive. Now view the page in the browser:

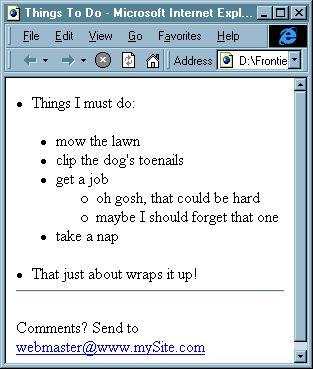
Our outline indentations have been faithfully reproduced as unordered (bulleted) list levels, through the addition of all the correct <ul> and <li> tags.
Clearly this could be a great labor-saving device if we want a bulleted list, because it makes it so easy to build the list and to rearrange it at any time later on and still come out with correct HTML.
Now, at the start of the outline, put in a line that says:
#renderOutlineWith "prettyOutline"and preview the page again. The effect is very different!
Everything at base level has been marked off with horizontal rules, turned into uppercase, and boldified. Everything at one level down has been numbered. And everything beyond that has been turned into ordinary paragraphs, blockquoted.
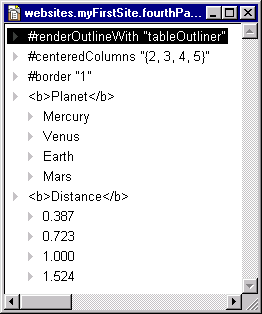
A useful outline renderer is tableOutliner. This is a quick and easy way to make an HTML table. The result is fairly simple -- all the columns are of identical width, for instance -- and the first row is automatically boldified; but this is often just what is needed. To try it out, make a fourth Web page, called "fourthPage," and have it be an outline that looks like this:

Now preview the page.
As you can see, the change in indentation in the outliner is being used to show where a new row is to begin in the table. When using tableOutliner, you get some extra directives. The #border, #width and #cellpadding values you provide are handed over to the <table> tag as parameters when the HTML is constructed. In #centeredColumns, you provide a list, in curly braces (as in my example), saying by number which columns you want centered.
Other included outline renderers touch your HTML in only very sparse ways. The twoLevelOutline renderer makes everything an <h4> (if it is at the outline's base level) or a <p> (otherwise).
The "newCulture" renderer doesn't even do that; just as with the way template outlines are rendered, it doesn't do much except make your HTML itself look nice with returns and tabs, to reflect the indentation of the outline but with no visible effect in the browser. For this very reason, the "newCulture" renderer is my favorite; it lets me do all my own HTML, plus I get to organize it with the advantages of an outline.
Where renderers live
Outline renderers, which perform this formatting magic, are Frontier scripts (programs). These ones live at user.html.renderers; Jump there and see. Knowing Frontier's programming language, UserTalk, enables you to study these renderers, as well as to write your own. They turn out to be very easy to write.If you write a renderer, you can keep it in user.html.renderers, or in the "tools" table in your site table; Frontier will look for your renderer in the "tools" table first, then in user.html.renderers, or it can live anywhere in the database and you give a reference to it. You can study the outline renderers further just by experimenting, rendering outlines with each of them in turn.
And now, a warning.
Frontier does look outside an individual outline for a #renderOutlineWith directive; these directives do work hierarchically, like other directives. This can be bad.
Recall that if you want to use the default bulleted-list outline renderer, the signal for this is that there is no #renderOutlineWith directive in your outline.
But if you have a #renderOutlineWith directive in a table containing your outline, it applies to your outline, and you won't be able to obtain the default renderer. To avoid this problem, never put a #renderOutlineWith directive into a table unless you know you will never want the default renderer for any outlines in that table.
Renderer-writing tips
I'm now going to sketch how to write a renderer. This is very advanced, so feel free to skip what follows; if you ever get around to writing a renderer, it will still be here.The renderer script is called with one parameter, a pointer to an outline. But this pointer is rarely used for anything during the action part of the renderer. By the time the renderer is called, the outline's directives and comments have been removed, and the outline is the target; so you can navigate the outline using op.xxx verbs. The outline is a copy, so feel free to modify it.
What you want to return is a string. How you derive this string from the outline is totally up to you! That's what rendering is. But there are four main strategies:
- Gather the lines of the outline into a string yourself, and return the string. Study tableOutliner for an example.
- Edit the outline in place; then send it to html.getOutlineHtml() to insert some HTML, and return the result (a string). Study siteOutliner for an example.
Html.getOutlineHtml () takes five arguments: a pointer to the outline (the parameter we originally received); [A] text to insert before the first line, and before every line indented with respect to the previous line; [B] text to insert after the last line, and after every line indented with respect to the following line; [C] text to preceed every line; and [D] text to follow every line. (C and D are tightest to the line; A and B go outside of them.) Nothing gets inserted that you didn't say to insert (like, returns after lines).
- Edit the outline in place, and coerce it to a string. This inserts tabs to show indentation, and a return after every line. This is how template outlines work; see also newCulture.
- Send the string from any of the above to html.processMacros () before returning the result. See newCulture for an example. I'm not clear as to what benefit accrues from this extra round of macro evaluation, though.