What is Frontier?
Download
News & Updates
Web Tutorial
Scripting Tutorial
BBEdit Scripting
Directory
Mailing Lists
Sample Scripts
Verb Set
Frontier Site Outline
User's Guide
1
2
3
4
5
6
7
8
9
10
11
Apple
File
Edit
Main
Open
Suites
Web
Window
Menubar
Outline
Script
Table
WP
Chapter 7: The Frontier Environment
This chapter describes Frontier's menus and windows.Frontier's Menus
Frontier has four permanent menus: Apple, File, Edit and Window.
All other menus are editable and can be customized, added to, or removed.
Three menus, Main, Open and Web, contain commands that virtually every Frontier user will need. We document them as we would document commands in a commercial software product.
Another menu, between Web and Suites, is named with your initials, indicating that it's a good place for you to put scripts which you want to access frequently.
The Suites menu is a place where software authors can add commands that add other menus. We also supply some standard suites, their commands are pre-installed in the Suites menu.
The menubar can also include a single dynamic menu that depends on the type of window that is frontmost in Frontier: Outline, Script, Menubar, Table or WP.
Because many menu items in Frontier are implemented with scripts, you can view and customize their behavior. We will describe the menubar editor window later in the chapter.
If you want to look at the scripts as you are reading about the menu items, hold the Option key and choose the item of interest. In the menubar editor window, click the Script button, in the upper-right corner of the editing window.
The standard menus
Each of the following pages documents the commands in the menus as UserLand ships them.
- The Apple Menu
- The File Menu
- The Main Menu
- The Open Menu
- The Web Menu
- The Custom Menu -- the one whose name is your initials.
- The Suites Menu
- The Window Menu
Modal menus
Each of Frontier's object editing windows has a companion menu. These menus are sometimes referred to as "modal" menus since they depend on the current mode or context.
An agent script checks the type of the frontmost window and displays the appropriate menu. The script that does the work is suites.modes.monitor, it is called by system.agents.statusMessage. If agents are disabled, the dynamic menu behavior will not work.
The menus are covered next, the editing windows at the end of the chapter.
Frontier's windows
As we have seen, Frontier includes several different types of windows. In this section, we will talk about how to navigate in and use each of these window types.
We begin with table windows. Then we discuss word processing windows. Next, we describe the use of the three types of outline-based windows: outline windows, menubar editors, and script-editing windows. Finally, we discuss the Quick Script window.
In general, these windows are like other Macintosh windows with which you are undoubtedly familiar. You can scroll them, zoom them, close them and resize them.
Table windows
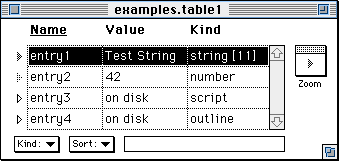
The Object Database is a collection of hierarchical table structures, viewed in table windows. Each table can contain any type of Frontier object, in any combination, including other tables.
Figure 7-2. Example object database table
To select an object in a table window, click on its item marker.
To navigate to a specific item, you can type the first letter of its name and Frontier will take you to at least the vicinity of the object you seek. If you can quickly type more than one letter of its name, Frontier will refine the position of the cursor.
To delete an object in a table window, select it and then use an appropriate Edit menu command or keyboard equivalent to remove it.
Adding a new object
To add an object to a table window, you can either use the Table menu option for the type of data you wish to add or you can follow this process:
- Select any item in the table, press Command-Return.
- Type the name of the new object.
- Press on the "Kind" popup menu in the lower left corner of the window and select the type of data you wish to add to the table.
- If the object is a scalar and you wish to do so, use the Tab key to get to the Value column and type a value for the object. For datatypes that have their own editing window, click the Zoom button or double-click the item marker to open its window.
If you enter a new item into a table, you can select a non-scalar type for it without having to use the "Kind" popup. Just double-click on its item marker. A dialog box (see below) will appear. You can pick any of the available non-scalar datatypes from this dialog and Frontier will open an appropriate editing window. You can also name the object as part of this process.
Figure 7-3. Dialog for Selecting Kind of Data for New Table Entry
Another way to create new table elements is described on The Table Menu page.
WP Windows
Frontier's word processing text windows work very much like most word processors and text editors. They have a ruler you can hide and show with Command-R or with the appropriate menu item on the WP menu. Select text by double-clicking on a word or triple-clicking to select a paragraph. You can extend a selection by positioning the cursor where you want the selection to end and holding down the Shift key while you click the mouse button.
Styling and formatting of text are handled through the ruler line and through the last five options on The Edit Menu.
To navigate in a word processing window, you can use the arrow keys to move up and down a line at a time or right and left a character at a time. The following table summarizes how the Command and option keys modify cursor movement.
Modifier Key Left Arrow Right Arrow Up Arrow Down Arrow Command Key top of doc bottom of doc top of doc bottom of doc Option Key left one word right one word left one word right one word Inserting new text into a word processing text document is a simple matter of positioning the cursor where you wish the new text to appear and typing the new text. Of course you can use all of the Macintosh's standard Cut/Copy/Paste operations as well.
Outline windows
There are three outline-based windows in Frontier: outline windows, menubar editing windows and script-editing windows. We'll first discuss outline windows since everything that pertains to them is also relevant to the other two types. Then we'll talk about the individual distinctions of the other types of windows.
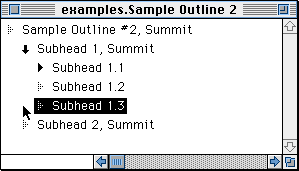
Figure 7-4. An outline
Frontier outlines differ from most computerized outlines in that they permit you to have as many summit-level (leftmost) headings as you like. A Frontier outline contains only text-based headings (lines), not pictures or other types of data. Headings do not word-wrap, no matter how many characters they contain. Each heading is limited to 255 characters.
You add a heading to a Frontier outline by pressing Return. If the current heading has any expanded sub-headings, the new heading is inserted as the first child of the heading. If it doesn't have any sub-headings, or if its sub-headings are all collapsed, the new heading is inserted as a heading at the same level as the one on which you pressed Return. If you want to make it a child of the current heading, use the Tab key.
To delete a heading, select it by clicking on its item marker and then deleting it using the Clear command or delete key.
Collapse and expand a heading by double-clicking on its item marker. If the heading is already collapsed, it expands. If it is expanded, double-clicking its item marker collapses it. Collapsing a heading always hides all of the headings subordinate to it, including sub-headings of nested sub-headings, and so on. Expanding a heading, however, only expands the next level down. With The Outline Menu, you can fully expand and collapse an outline.
Moving the outline cursor
An outline can be in one of two modes for editing and navigation purposes. In text mode, the entire heading is not selected. The cursor is either positioned between characters or it selects multiple characters (including every character on the line, but not the item marker). In that mode, navigation follows the same rules as word processing documents described above. When the outline is in outline mode (or "structure" mode), however, the entire heading is selected by the bar cursor. You can switch into and out of text mode in an outline with the Enter key. (Scripting tip: because of the relationship to word processing, the scripting commands to deal with text mode are in the "wp" category, wp.inTextMode and wp.setTextMode.)
The following table describes how the Command and Option keys control navigation in an outline when it is in its default outline or "structure" mode.
Key No Modifier Option Command
up previous sibling previous sibling first sibling
down next sibling next sibling last sibling
left flat up parent first summit
right flat down first sub last expanded heading In outline terminology, "flat down" means go up to the next expanded headline, regardless of structure, and flat up means go down to the previous headline.
If the cursor can't move in the indicated direction, the speaker beeps.
These movements can be executed from a script using the built-in op.go verb.
Reorganizing outlines
In addition to the normal Cut/Copy/Paste operations, you can also reorganize a Frontier outline in one of these ways:
- dragging outline headings
- using the Tab and Shift-Tab key combinations
- using promote/demote operations
- using special Command-key combinations
If you click on a heading's item marker and hold the mouse button down, the cursor changes into a small hand that appears to be grasping the item marker. You can physically drag this item in the outline. Other item markers will turn into arrows pointing up, down, or on a 45-degree angle down and to the right indicating where you are about to place the outline segment.
The following screen shot shows a selected heading being dragged so that it appears as a new summit. Notice that the item marker of Summit 2 is a down-arrow indicating that the user is presently moving the heading so that it is directly under and on the same level as Summit 2.
Figure 7-5. Moving a Heading by Direct Manipulation
If you press the Tab key while you're on a heading in outline mode, Frontier moves that heading to the right if possible. Shift-Tab moves the heading to the left if possible. If either movement is blocked because the heading on which you are positioned is already as far right or as far left as it will go, Frontier beeps.
The ability to use the Tab key for reorganizing an outline can be turned on and off with the UserTalk verb op.tabKeyReorg.
You can choose the Promote and Demote options from the Outline menu to reorganize part of an outline as well. Each of these options works on the sub-headings of the current heading. If you promote sub-headings, you move them all to the left one level. If you demote them, you move the siblings below the selection to the right one level.
Fast reorganization using key combinations
Frontier includes four fast reorganization key combinations:
- Command-U -- Moves selected headline up, swapping with its previous sibling.
- Command-D -- Moves the selected headline down, swapping with its next sibling.
- Command-R -- Moves the selected headline to the right, making it the last child of its previous sibling.
- Command-L -- Moves the selected headline to the left, making it the next sibling of its previous parent.
It's worth learning these keys, they are key to getting really productive outlining with Frontier.
The Frontier outliner also supports hoisting and de-hoisting operations which allow you to look at only part of an outline as if it were the entire outline.
You can switch an outline between structured mode (which is its default condition) and flat mode with the UserTalk verb op.flatCursorKeys. In that event, the arrow keys work differently from the way they work in structured mode. See DocServer for details.
More information on using Frontier's outliner can be found on the Outliner Crib Sheet page.
Script windows
As with menubar-editing windows, script editors operate nearly identically to other outline windows in Frontier, with a few extra issues to consider:
- To insert a comment line as you type in a UserTalk script, press Return while you hold down the Shift key. (In fact, this shortcut works in a normal outline too.)
- Toggling comments with the menu or keyboard equivalent can change the nature of headings embedded under the heading whose type you change. Chapter 3.
- Command-clicking on an item marker toggles a breakpoint on that line.
When you have entered a script into a script-editing window and you wish to run it from there, you can do so just by clicking on the Run button.
If you want to debug your program -- whether that means simply tracing through its execution to understand it better or looking for an error of some sort -- you can click on the Debug button in the script execution window. That will display debugging options. Debugging is described in Chapter 3.
Menubar windows
This section describes how working with the Frontier Menubar Editor differs from working with ordinary Frontier outlines.
Figure 7-6. Frontier's Menubar Editor
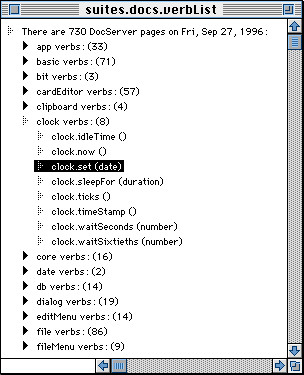
The menubar editor organizes menus as an outline, with the item markers (triangle-shaped objects) on the left side of the window indicating whether a menu item has unexpanded sub-headings (if it is black) or not (if it is gray).
When you edit in a menubar window, you're editing a menu. The contents of the menu is displayed in the system menubar at the top of your screen.
A sub-heading is a nested sub-menu. As you reorganize the outline, you are reorganizing the menus.
Figure 7-7. A portion of system.misc.menubar
You can examine the script connected to a menu item by selecting it or positioning your cursor in it and then clicking on the Script button.
If you type a single hyphen as the entry in a heading, the system expands that to a full menu separator.
You can see which Command-key equivalents have been set for this menu and set up your own from the Cmd: popup menu in the lower left of the window.
The Menu Editor command, Command-M, in The Open Menu, lets you customize any of Frontier's special menus, including adding your own menu items, renaming or reordering those that are provided by UserLand, deleting menu items, or changing the behavior of menu items.
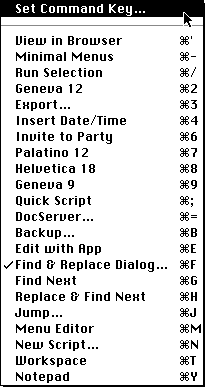
You can also assign or change the Command key associated with a menu item. Press the mouse down on the popup menu in the lower left corner of the window (see Figure 7-2) and choose Set Command Key... to change the current setting or add a Command-key equivalent to a menu item that does not presently have one assigned.
Figure 7-8. Popup for Command Key Assignment in Menubar Editor
Frontier asks which Command key you wish to assign to the selected menu item. To remove a Command-key assignment, press Backspace (or delete) key in the dialog.
Figure 7-9. Command-Key Input Dialog
Frontier looks for Command-key equivalents from right to left on the menubar and from top to bottom within a menu. If you assign the same Command key twice on a menu, Frontier will find the first occurrence of the Command key each time it is used. Assigning duplicate Command keys is not generally recommended, though some suites do so.
Quick Script Window
The Quick Script window provides a place for you to enter short scripts (usually just one line) and execute them immediately. Just type the text and press the Enter key or click the Run button. For multi-line scripts, you may find it easier to use a normal script in the Scratchpad or Workspace tables, where Frontier's outliner captures the structure of the script.
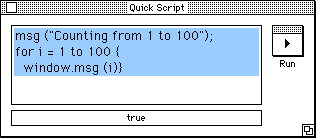
If you do type a multi-line script into Quick Script, you must include extra syntax to indicate the structure:
- Wherever you would normally place a carriage return in a script (i.e., when starting a new line or heading), you must use a semicolon in the Quick Script window.
- Wherever you would use a Tab key to indent one or more lines of code in a script, you must use curly braces in the Quick Script window around the lines that would be indented in a script outline. In this case, you must not add a semicolon to the preceding line.
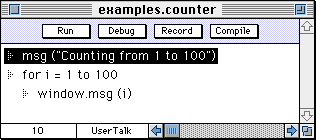
The first screen shot shows a small sample script as entered in a script editing window. The second picture shows the same script as it would be formatted in the Quick Script window.
Figure 7-10. Usage of syntax characters.

© Copyright 1996-97 UserLand Software. This page was last built on 5/7/97; 1:09:19 PM. It was originally posted on 9/24/96; 9:42:18 AM. Internet service provided by Conxion.
