What is Frontier?
Download
News & Updates
Web Tutorial
Scripting Tutorial
BBEdit Scripting
Directory
Mailing Lists
Sample Scripts
Verb Set
Frontier Site Outline
User's Guide
1
2
3
4
5
6
7
8
9
10
11
Apple
File
Edit
Main
Open
Suites
Web
Window
Menubar
Outline
Script
Table
WP
Chapter 10: Suites
A suite is a collection of one or more scripts, optional data, and an optional menubar, designed to work together to accomplish a certain task.Some of Frontier's features are implemented as suites, for example, the Scheduler Suite). Many Frontier experts have created suites to share with others -- perhaps you will be next!
Suites
You can think of a suite as an application that is written in UserTalk or AppleScript and runs from the Frontier environment. A suite has its own table in the suites table. The table contains one or more scripts and associated data, ranging from a few constants (such as default color or date of last backup) to outlines, word processing documents or even tables of additional information. Many suites also have a custom menu. When correctly installed, it can be selected from the Suites menu.
If a suite has a menu, the suite's table must include:
The menubar object usually contains a single menu, but more are allowed. (Of course, be aware that small monitors may not have room for many extra menus.) Many suite menus encourage customization by including the following 2 standard items, usually at the end:
- a menubar object named "menu"
- a script called installMenu that installs "menu" on the menubar
- Edit Menu, Command-M -- open the suite's menu into the menubar editor
- Edit Table, Command-T -- open the suite's table
This section walks through the process of creating a suite to track your activities. Whenever you develop software -- including simple scripts -- it's helpful to have a plan. Here are the steps we will follow:
- Describe the desired functionality.
- Define the needed scripts.
- Define and build the menu to call these scripts.
- Write the scripts.
- Attach the new scripts to the new menu.
- Create any empty documents or objects needed by the scripts.
- Test the suite.
- Add the suite to the Suites or Custom menu.
- Test the launch of the suite from the menu.
- Save the revised root.
Describing the Desired Functionality
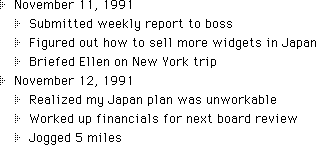
The suite we want to build will allow us to keep a running chronological list of our accomplishments. Each day will be a summit in a Frontier outline. Under each day will be one or more sub-headings, each containing a brief description of some task we accomplished that day. The outline will look something like Figure 10-1.
Figure 10-1. Sample List of Accomplishments
We want to be able to add items to the list as easily as possible. The program should keep track of today's date and make sure that it adds things to the right day's list. We also want to be able to ask the program how many things we've accomplished since we started keeping the list.
Notice that because Frontier has a built-in outliner, there are a number of things we don't have to build into our application (suite). For example, printing is handled for us. So are deleting items, editing their contents, and examining them in context. Frontier's wealth of integrated features dramatically reduce your development time.
Defining the Needed Scripts
From the description of what we want our suite to do, we can come up with a list of the scripts we'll have to write.
We need a script we can invoke with a menu command that asks us to identify an accomplishment, opens the list, finds out if this is the first one for today, adds a heading for today's date if necessary, and finally inserts the accomplishment. We also need a script that will tell us how many items we've added to the list since we created it.
Implied but not explicitly described is a need for another script: one that will simply open the list so we can review it, print it, or work with it.
A suite also has three standard scripts: one to edit this suite's menu, one to edit its table, and one to install its menu when the suite is launched by the user.
Defining and Building the Menu
Since the menu is simple, let's build it right away. First, we need to create a table in the suites table to hold the menu, scripts and data. Let's call this new item "Activities." Jump to the suites table by pressing Cmd-J and typing "suites" in the dialog.
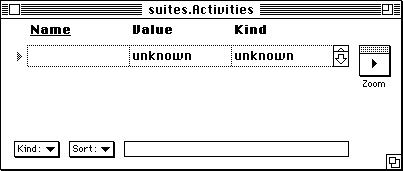
Select "New Sub-Table" from the "Table" menu then type the name "Activities" into the dialog. (Of course, you could also press Command-Return to create a new entry, and select "Table" from the "Kind" popup menu.) Click the Zoom button or double-click this new entry's item marker and you'll find yourself editing an empty table (see Figure 10-2).
Figure 10-2. Empty "Activities" Table
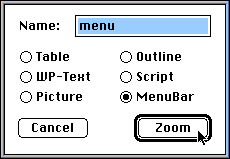
Since the first thing we want to build is this suite's menu, let's enter it into the table. Type "menu" and click Zoom or double-click the item marker. A dialog appears asking you for the type of the new object:
Figure 10-3. Type choosing dialog
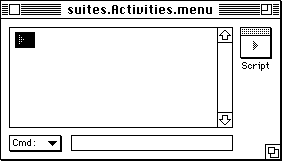
Click on OK a menu editing window opens. (see Figure 10-4).
Figure 10-4. Blank Menubar Editor
Notice the window's title. You are editing the menu entry in the Activities sub-table in the suites table at the root level of Frontier.
A menu has one summit, the name that will appear on the menu bar when the menu is displayed. Call it what you like; we'll use "Tracker." Type this title in at the summit of this menubar outline editor. Press Return and then Tab.
The first item in this menu ought to be the one we expect to use most often, probably adding items to the list. Type "Add an Item" -- but before you press Return, pause for a moment. If we're going to be really busy adding things to this list of accomplishments, we might want a keyboard shortcut for invoking the process. Since it's so easy to add this feature in Frontier, let's do it.
Deciding which character to use is a bit tricky. You might be tempted to use "A" since it's the first letter of the menu entry. The problem is, the Edit menu uses this Command-key equivalent to select all of the text. You might well want to be able to do that with the Tracker suite open. We chose to use Command-I ("Item") instead. If you prefer some other key, feel free to substitute it. Don't use Command-M or Command-T, though, because we're going to define those later in this menu.
Look at the Frontier menubar. Notice that it is building your menu as you create it! This immediate feedback enables you to check to make sure the menu looks like you want it to look before you move on to the next task.
Following the same procedure, add the following items to the Tracker menu:
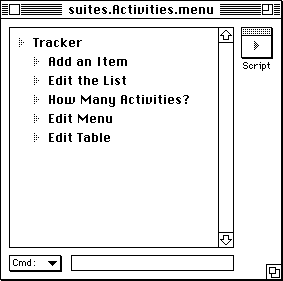
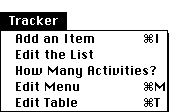
The menu as you view it in the editor should now look like Figure 10-5. Its menubar version looks like Figure 10-6.
- Edit the List
- How Many Activities?
- Edit Menu (Command-M)
- Edit Table (Command-T)
Figure 10-5. Tracker Menu Nearly Complete in Menubar Editor
Figure 10-6. Tracker Menu Nearly Complete on Menu Bar
There is one thing wrong with the menu as it now stands. All of its functions are jammed together. There aren't any separators (dotted or gray horizontal lines) to separate the items into logical groups. Let's add two separators, one after "Edit the List" and one after "How Many Activities?". To do that, just position the bar cursor in the menubar editor on the line before the desired separator (in the first case, "Edit the List") and press Return. Now type a single hyphen. Repeat the process for the second separator.
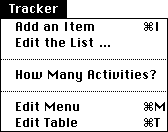
As long as we're polishing things up, let's make another change. Select the text "Add an Item" and type an ellipsis (Option-semicolon) at the end of it. This lets the user know that when this menu item is selected, a dialog box will appear in which the user will be expected to provide some information. Now the menu looks like Figure 10-7.
Figure 10-7. Final Version of Tracker Menu Pull-Down
As you can see, this version is much cleaner and easier to read.
Writing the scripts
We need six scripts, as we've already determined. In a large suite, it's helpful to write the scripts in an order that lets you test each one before going on to the next. For this suite, the order doesn't matter much. Let's start with the easy ones. (Actually, in "real life," sometimes it's better to start with the hard ones!)
To write the script that will open the list of accomplishments for editing, we need to know what we want to call the outline. If we were going to incrementally test at each step, we would create the outline now; we're going to forego that nicety to make the explanation simpler. Let's call the outline "Accomplishments." Now we're going to write a script to open that outline.
Create a new entry in the suites.Activities table. Name it editList. Identify it as a script object and open it. This script is simple:
edit (@Activities.Accomplishments)Because suites is a known path in Frontier, we don't need to include the full name of the table, only enough to enable Frontier to locate it. Once you've entered this script, click on the "Compile" button to be sure there aren't any errors. Then close the script-editing window.
Let's take care of our other small scripts while we're at it. The three standard scripts are easy. First, create a script called "installMenu" and enter:
In the previous script we took a shortcut, omitting the "on" handler. In this script, we included it. The single script statement uses the Frontier verb menu.install to install the menubar stored in the Object Database at the address Activities.menu. It returns the result (hopefully "true" to indicate success!) to the calling routine.
Scripts for the other two standard items can be associated directly with the menu item, we don't need a script object in the table. Go to the Menubar editor, click on the "Edit Menu" item and click the "Script" button. Type this line:
edit (@Activities.menu)Similarly, open the "Edit Table" item's script and type this line:
edit (@Activities)Now let's work on the script that will tell us how many items have been added to the list of our accomplishments since we opened it. This routine takes a bit of thought. There are at least two possible approaches we could take. We could write a script that would open the list (the outline) and count the number of items in each heading, accumulating the total. Or, we could create a variable in our Activities table and increment it each time we add an item to the list. This latter script would execute more quickly but has a drawback. If the user adds or deletes items from the list manually, outside the Tracker suite, our total won't be right. For our present purpose (a simple example!), we've decided this problem is not critical.
We decide, then, to store the number of accomplishments in the table in a numeric entry called howMany. Again, if we wanted to test this function incrementally, we'd have to create this entry now. Let's just write the script as if the entry existed; we'll create it when the time comes.
When the user asks for a count, how can we display the information? Look through the Dialog verbs using the Frontier verb list or DocServer; dialog.notify looks good. Let's create a new script entry in the Activities table, and name it tellHowMany.
Note that the plus sign is a string concatenation operator, used here to insert the value from Activities.howMany into the middle of the string we display to the user on request.
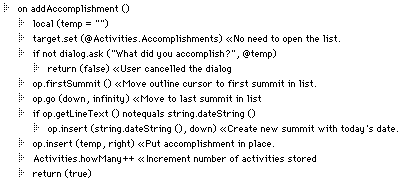
We're down to our final script, the one that does all the hard work in our suite. Create a new script in the Activities table. Call it addAccomplishment. Here is the UserTalk code that goes into this script; it is explained below.
This script begins in the usual way with the keyword "on." The first line declares a local variable called "temp." We give this local variable an initial value of an empty string; otherwise, Frontier will assume it is a number and give it a value of 0. Normally that wouldn't matter since Frontier would change the variable to a string whenever string data was assigned. In this case, however, the value or text of the variable is the default answer for the user in the dialog.ask verb.
The second line sets the target of the following verb operations. The target is an important notion in UserTalk; see DocServer for details. Essentially, setting the target opens an invisible outline (or word processing text) window; subsequent outline ("op") commands operate on the contents. You could open a visible window using the edit verb, but it's nice to enter the data without bothering the user with the details.
The next two lines use another dialog verb to ask the user to describe an accomplishment. The user may press the "Cancel" button so we use "if not" to catch the result of false and stop (by returning out of the "on" handler to whatever called the script). We store the user's response in temp.
The following five lines update the outline. First, we place the cursor on the first summit in the outline. Then we use the op.go verb to move all the way to the last summit. (Note that if there is only one summit, no movement takes place and the verb returns a value of false. Normally, we'd check for that condition, but since our only intent here is to make sure we're on the last summit in the outline, this situation causes no harm.)
The next line uses op.getLineText to read the last summit in the outline and compares it to the current date. If they are not equal, the script inserts a new summit with the current date. Either way, the script inserts the accomplishment to the right of (under) this last summit.
We increment the value of the counter that's keeping track of how many accomplishments we've added. Finally, we return a value of true indicating successful completion.
Attaching Scripts to the Menu
Now that the scripts are written, we could test them before we add them to the menu. Since this suite is pretty simple, we'll proceed without testing.
If the Tracker menu is still on the menu bar, type Command-M to edit its menu. Otherwise, open the menubar in one of the other usual ways.
Select the item "How Many Activities?" and add the following as its script:
Activities.tellHowMany ()Similarly, open the "Edit the List" item's script and type:
Activities.editList ()Finally, for the "Add an Item" menu item's script, type this line:
Activities.addAccomplishment ()This would be a good time to save the root if you're as paranoid as we tend to be about computer systems, power companies, lightning bolts, and the like.
Create Needed Objects
Besides the menu and the scripts, this suite calls for two pieces of data to be stored in its table: an outline called Accomplishments and a number called howMany. If you were creating the suite for others to use, you should modify the scripts to create the items if the don't exist. For this example, we'll just create them by hand.
Create a new number object called howMany. Notice that Frontier obligingly initializes its value to 0, which in this case is exactly what we want. If we wanted it to have some other initial value, of course, that would be easy to assign.
Now create a new outline object called Accomplishments.
You are ready to test your suite.
Testing the Suite
There are many approaches to testing. The goal is to test every script under as many circumstances as you can think of. Here's one way to test the Tracker suite.
- In the Quick Script window, type and execute this line to start the suite running: Activities.installMenu ().
- From the Tracker menu, select "Edit Menu." Make sure the menubar editor appears, then close it.
- Select "Edit Table" from the Tracker menu; make sure the table appears, then close it.
- Select "How Many?" from the Tracker menu. It should display a dialog box telling you that you have added 0 items to the log.
- Select "Add an Item" from the menu or type Command-I. When the dialog appears asking you what you accomplished, type something short that you'll remember. Press Return or click the "OK" button.
- Select "How Many?" from the Tracker menu. It should show a value of 1.
- Add another item or two, repeating the previous two steps.
- Now select "Edit the List" from the Tracker menu. When the list appears, confirm that it has today's date as its first summit and your items under it. (There may be a blank summit at the top. It's harmless, but if it bothers your sense of aesthetics and balance, delete it.)
- Edit the date so that it is yesterday's date (or last Tuesday's or the anniversary date of the last Mets' World Series victory; whatever you like as long as it's not today).
- Close the outline.
- Add another item or two to the list.
- Select "How Many?" from the Tracker menu and satisfy yourself that the counter is indeed keeping accurate track of your life.
- Select "Edit the List." Now you should see two summits, one with the date from Step 9, the other with today's date, each with its items beneath it.
That's probably sufficient testing for this suite. Unless you ran into bugs you had to fix, you're nearly done.
Adding the Suite to a Menu
It would of course be terribly inconvenient to type the script name into the Quick Script window each time you want to run your Tracker suite. Let's add a menu item to the Suites menu. (Actually, you can add to any of the customizable menus, but the suite menu is the recommend location.)
You already know how to edit menus, so we'll just zip through it quickly. Open the Suites menu with the Option key held down. Pick the place you want this suite added, position the bar cursor on the previous item, press Return, and type "Tracker" (or any other name that will remind you of the suite's purpose). Now click on the script button and type:
menu.addSuite (@Activities)Notice that the menu.addSuite verb requires the address of the table whose menu you wish to add. Because the suites sub-table is part of the Frontier path table stored in system.misc.paths, you need not supply a full address to its location in the Object Database.
Testing Launch from Menu
Select the "Tracker" (or whatever you called it) option from the Suites menu and ensure that it displays the right menu and that the menu options all work as expected.
Saving the Modified Root
Save the root file again if you want to keep your changes. Congratulations! You have added a suite to your Frontier environment and learned some basics about scripting Frontier's outliner.
Suites that ship with Frontier
Here's a summary of some of the suites that ship with Frontier.
backups -- holds a script that creates a backup command of your Frontier root file in a sub-folder from your Frontier folder.
buglist -- makes it easy for script writers to keep a list of bugs in their scripts and suites. We used this suite in developing Frontier. We thought it would be cool to leave it there for script writers to use.
commercial -- scripts and a menu bar that make it easy for professional developers to add, maintain and export their IAC features for Frontier script writers.
docs -- holds the complete Frontier verb list, it can be rebuilt using the DocServer application. You can open the verb list from the On-Line Docs submenu in the UserLand menu.
modes -- maintains Frontier's modal menus -- this part of Frontier is open-architecture too. When an outline window is in front the Outline menu is inserted in the menu bar. When a table window is in front you see the Table menu. These menus can be modified by script writers. They're here in the modes suite.
netutils -- maintains a set of consistent folders, very useful for managing networks of Macintoshes. You can also run this suite to set up your PowerBook hard disk when you go on the road. A much more detailed readme text is opened automatically when you import the netutils suite.
samples -- lots of scripts show you how to write Frontier scripts that live in the object database.
states -- a suite that holds the names of all 50 United States, and includes a script that gets you the name of the nth state. Used in lots of testing scripts.
tablemap -- maintains an outline-structured map of Frontier's object database hierarchy. Makes it easier to see what's there. Put your cursor on any line and press cmd-J to open a database window.
testing -- UserLand testing scripts, including SuperStress. We left this in to help with support, if a user is having problems, we want to have the stress tester script available. Also provides examples for script writers.
todo -- manages a to-do list, allows you to move items to the done list with a single command. Optionally allows you to install an agent that reminds you what's on your todo list in messages in Frontier's main window.

© Copyright 1996-97 UserLand Software. This page was last built on 5/7/97; 1:10:50 PM. It was originally posted on 9/24/96; 9:43:43 AM. Internet service provided by Conxion.
